Houdini Tutorial: Turning Something Into Sand
The basic idea is to create the grain solver setup using the tool shelf buttons and then use an attributeVOP to check if there are sand grains near the points of the geometry.If there are no grains near the geometry set the Alpha parameter on the points of the pig to 0. I'm working in Houdini 15.5. OK, let's begin.
Step 1: Grain Solver
Create the pig head test geometry: Create a geometry node, dive inside, delete the file node, and create a test geometry → pig head.
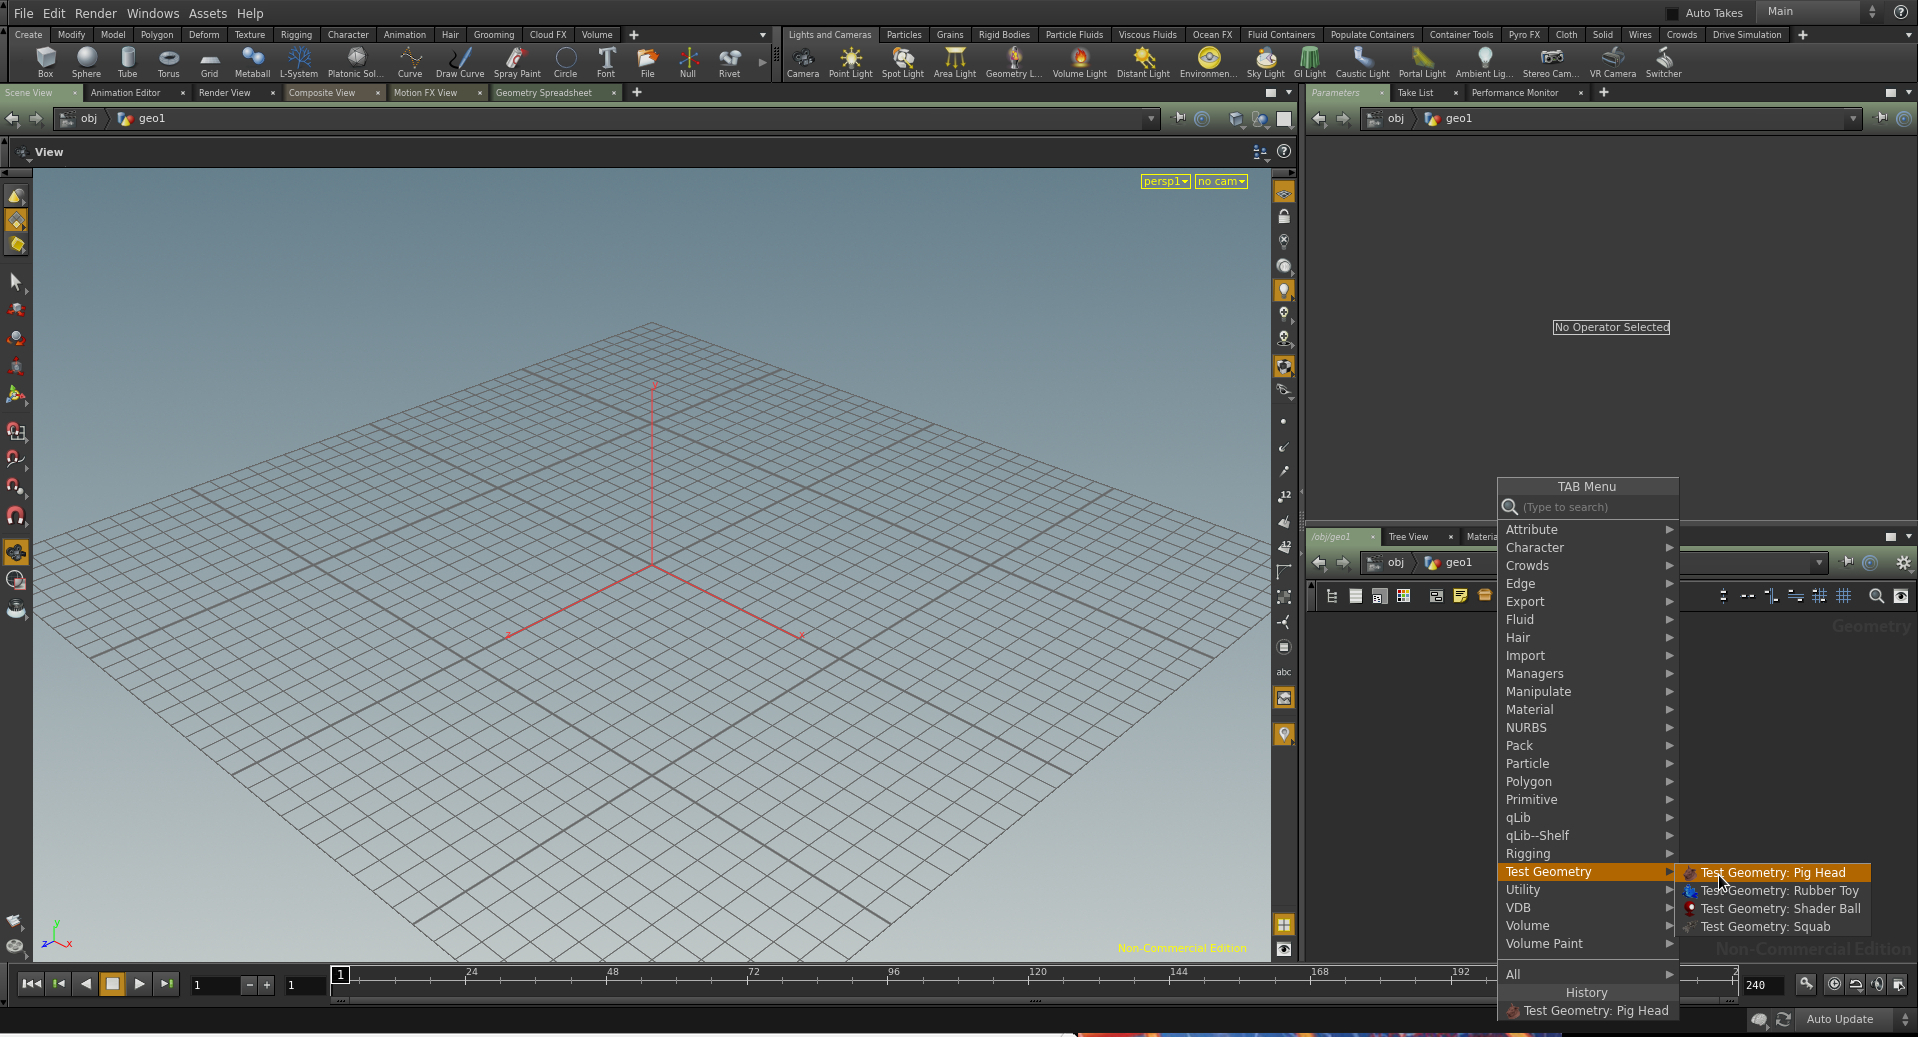
Go to the Grains shelf, and with the pig head selected at the object level, click the “Wet Sand” or “Dry Sand” button. Either one will work fine.
Go to the Rigid Bodies shelf and click “Ground Plane”. Move the pig head so that it is above the ground plane. If you hit play you should see the sand fall on the ground.
The default grain size is way too big. Dive into the AutoDopNetwork and change the Particle Separation on the grain_update node to something like .02. Run the simulation again. Find a good balance for yourself between what will run and what looks nice. You can upres later.
Step 2: Gravity Mask
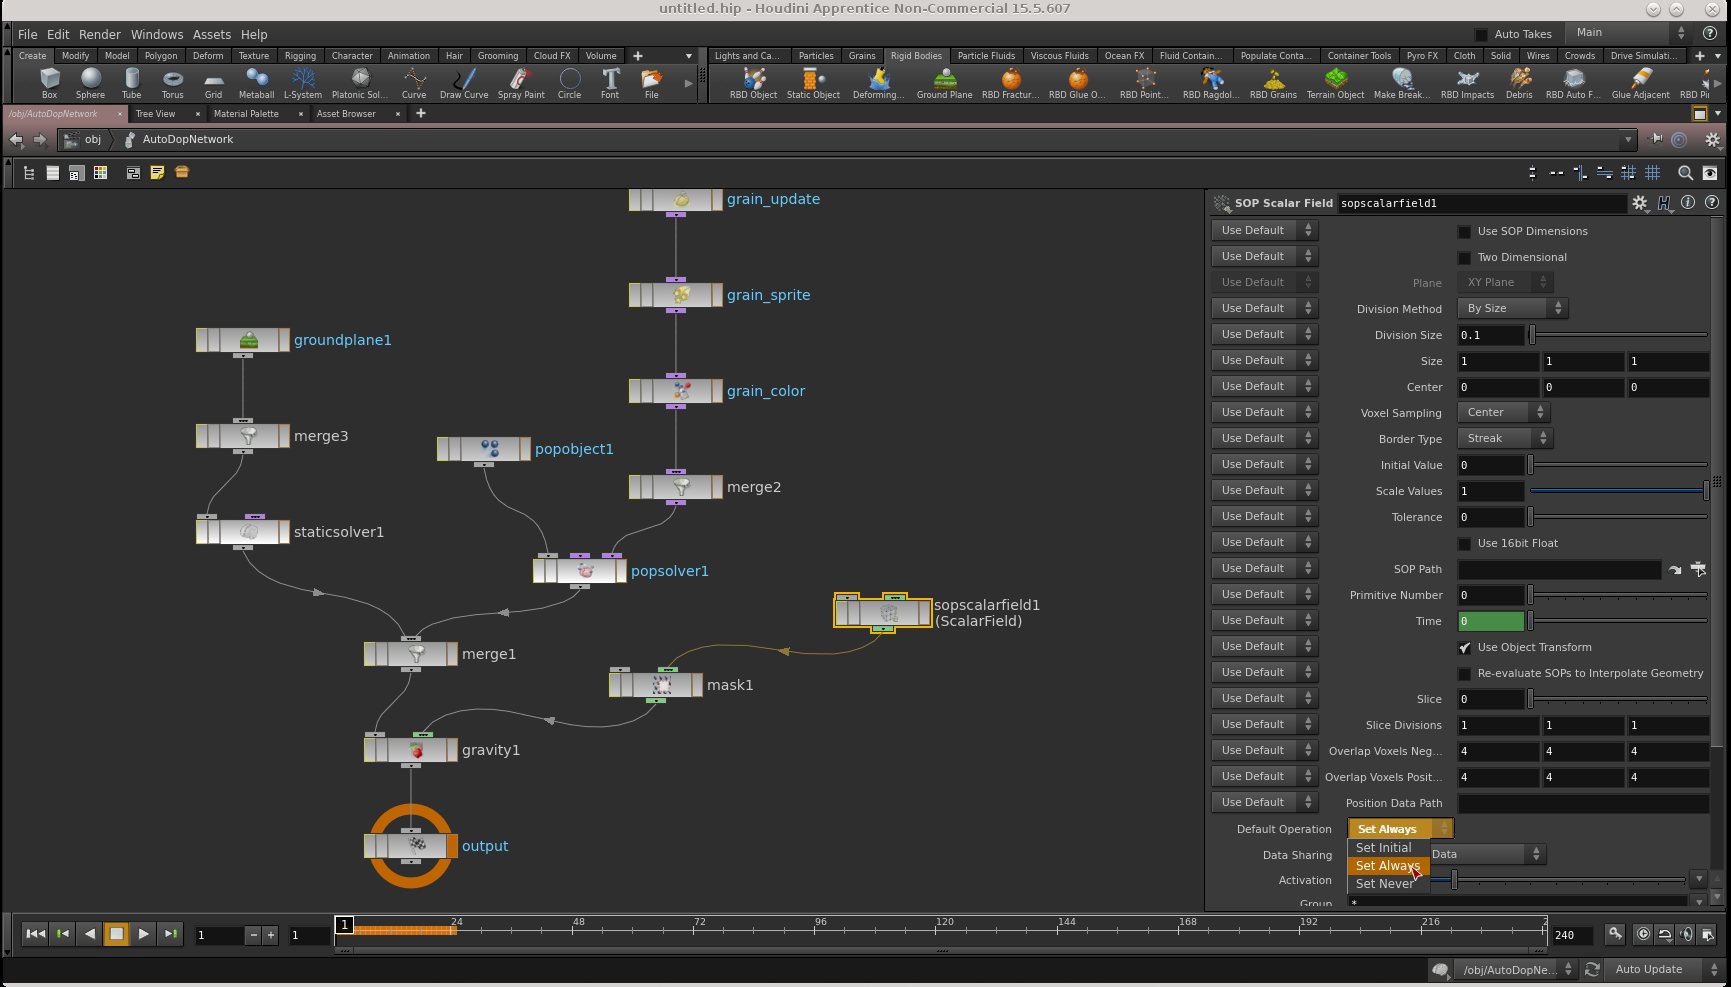
Now we have to create an animated volume that we can drag across the pig to turn on the gravity force. Dive into the AutoDopNetwork and add a mask node to the second input of the gravity node. You need to change the Default operation drop-down to Set Always, so that the animation of the volume will be picked up on every frame.

Now add a SOP Scalar Field node to the second input of the mask node. This will point at the volume we are about to create. Again, remember to change the Default Operation to Set Always.
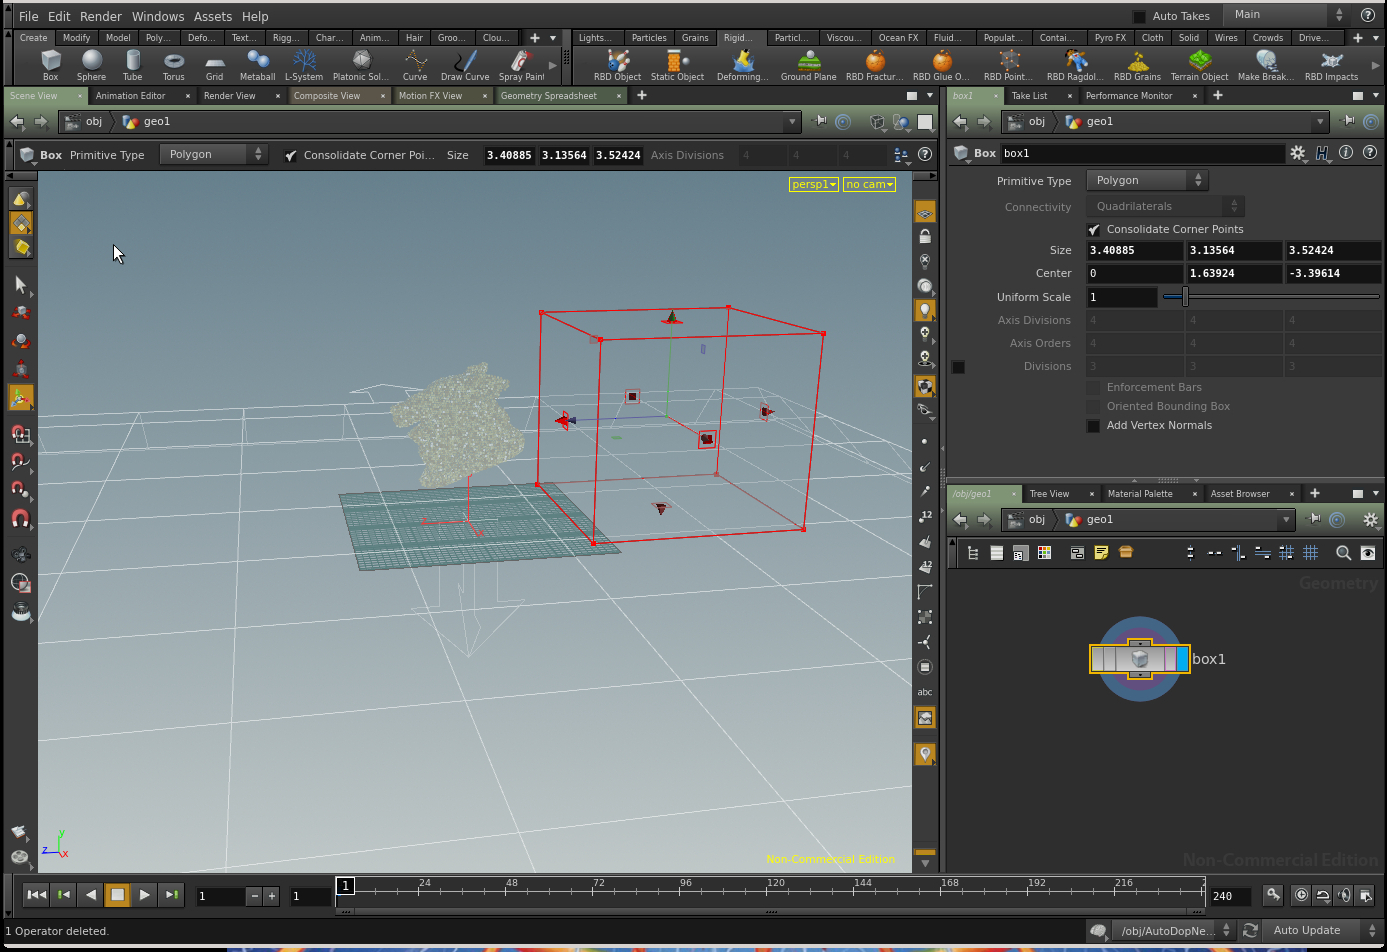
Go back up to the object level and create a box. Move it to one side of the pig, as shown. Set a keyframe on the Center Z parameter at frame 1. Move the box so that it completely encloses the pig and set a keyframe around frame 60. This will be the mask that determines when the different parts of the sand start to fall due to gravity.
Add an isoOffset node to the box. It wouldn't hurt to crank the divisions up to 30 or 40. If you are a stickler for neat scene files add a null under the isoOffset and rename it OUT.
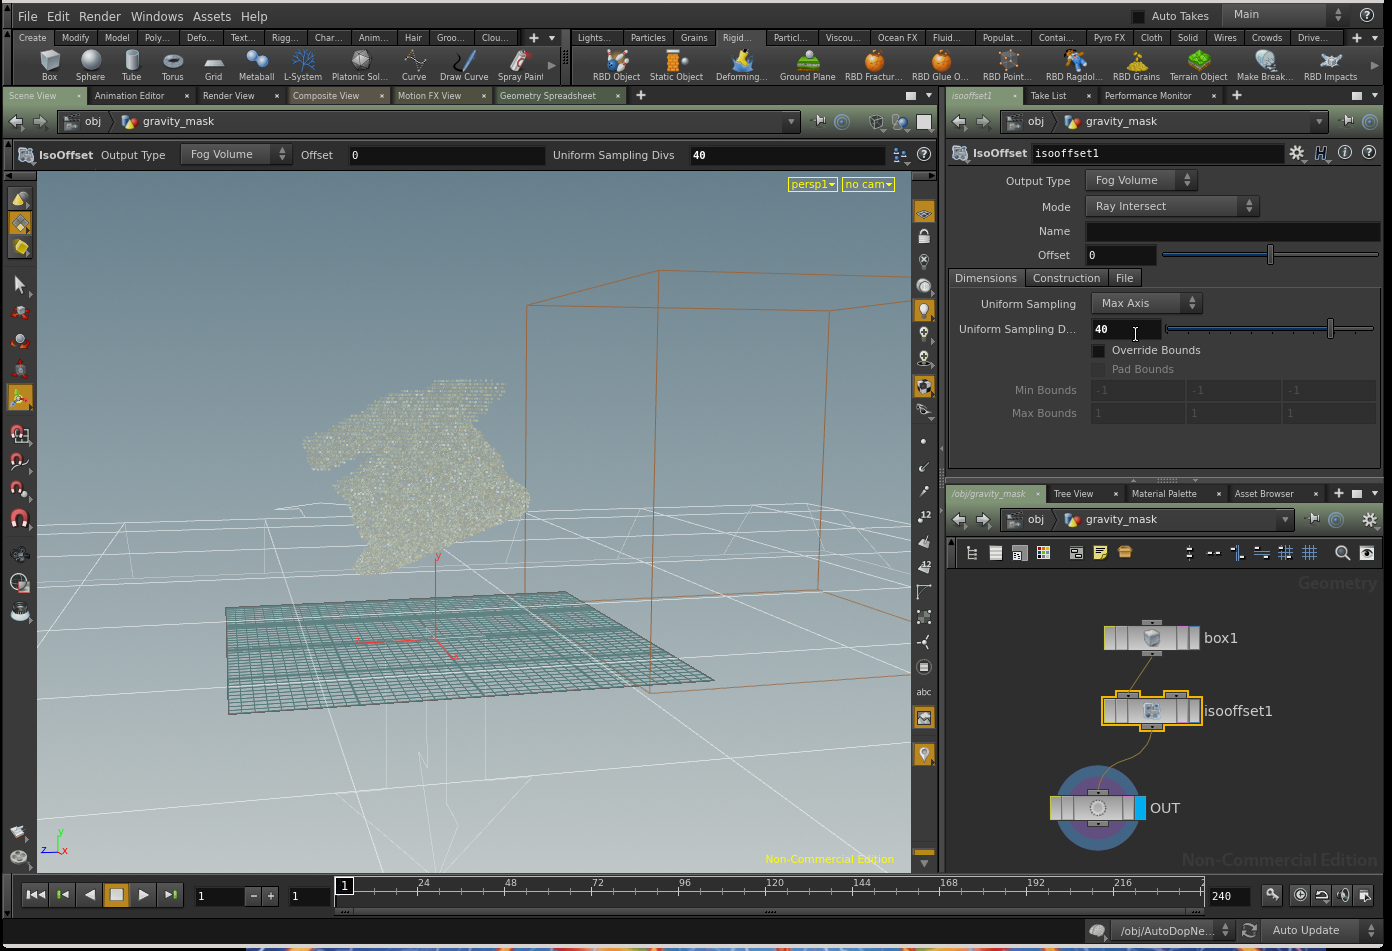
Now when you play the simulation you should see the sand start falling on the right first, and at the snout last.
Step 3: Alpha
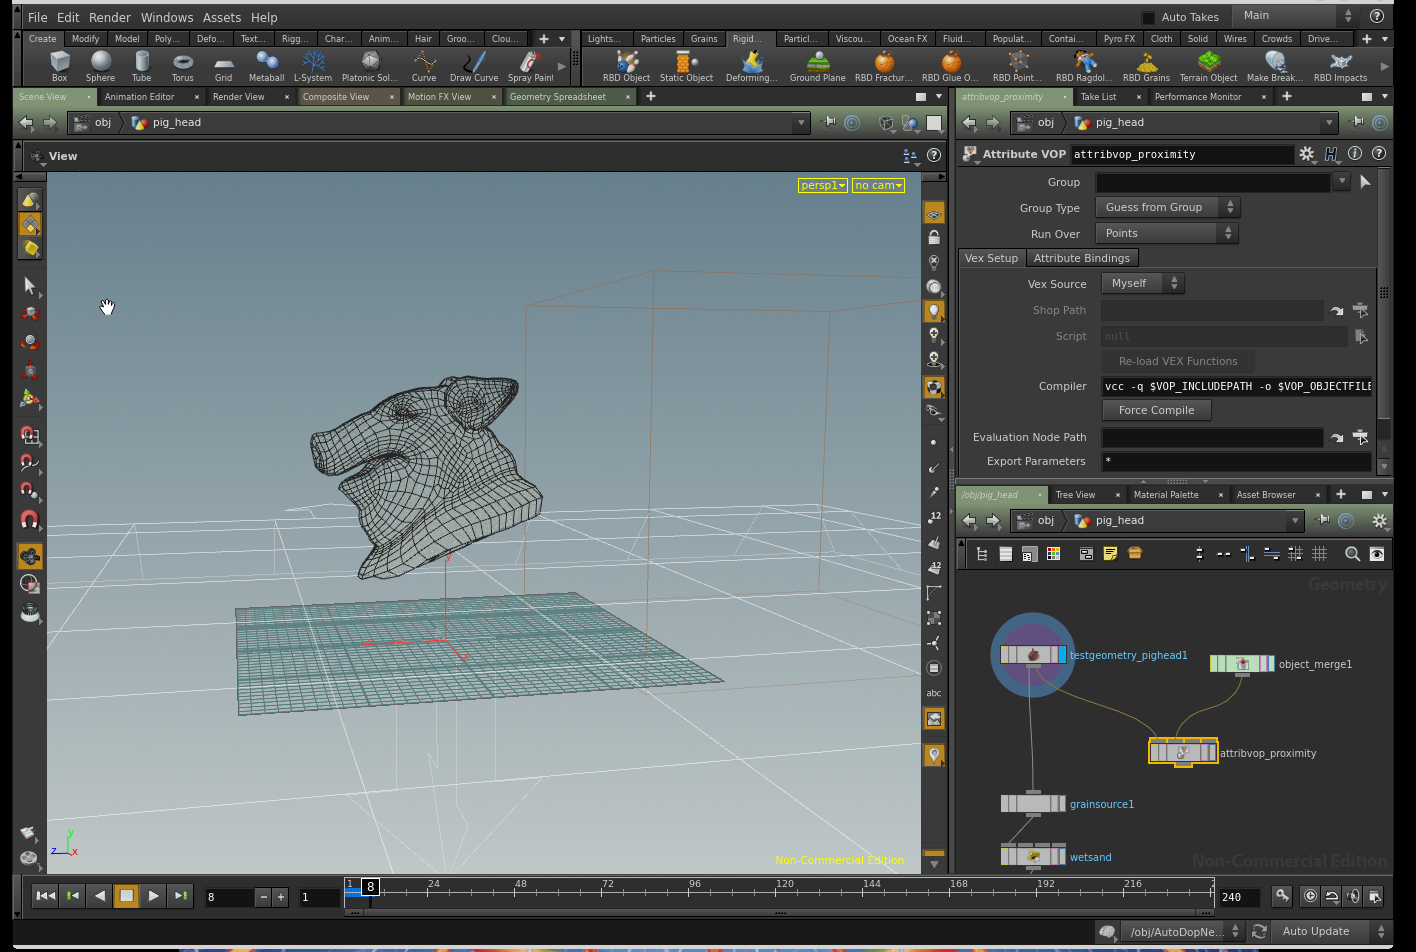
Now comes the part where the pig geometry disappears as the sand starts to fall. You could probably do this with an attributeFromVolume node, but I chose to do it the hard way, using some VOPs with point cloud nodes inside them.This is not the most robust approach but it frees you from the mask geometry. The opacity of the pig is driven only by the sand, not by the box that's driving the sand. That may be an advantage in some hypothetical situation.
This work will all be done in the pig head geometry. Create an objectMerge node to bring the /obj/grain_particles/import_grain into this context. Create an attributeVOP node. Hook the pig head into the first input and the grains into the second input, as below:
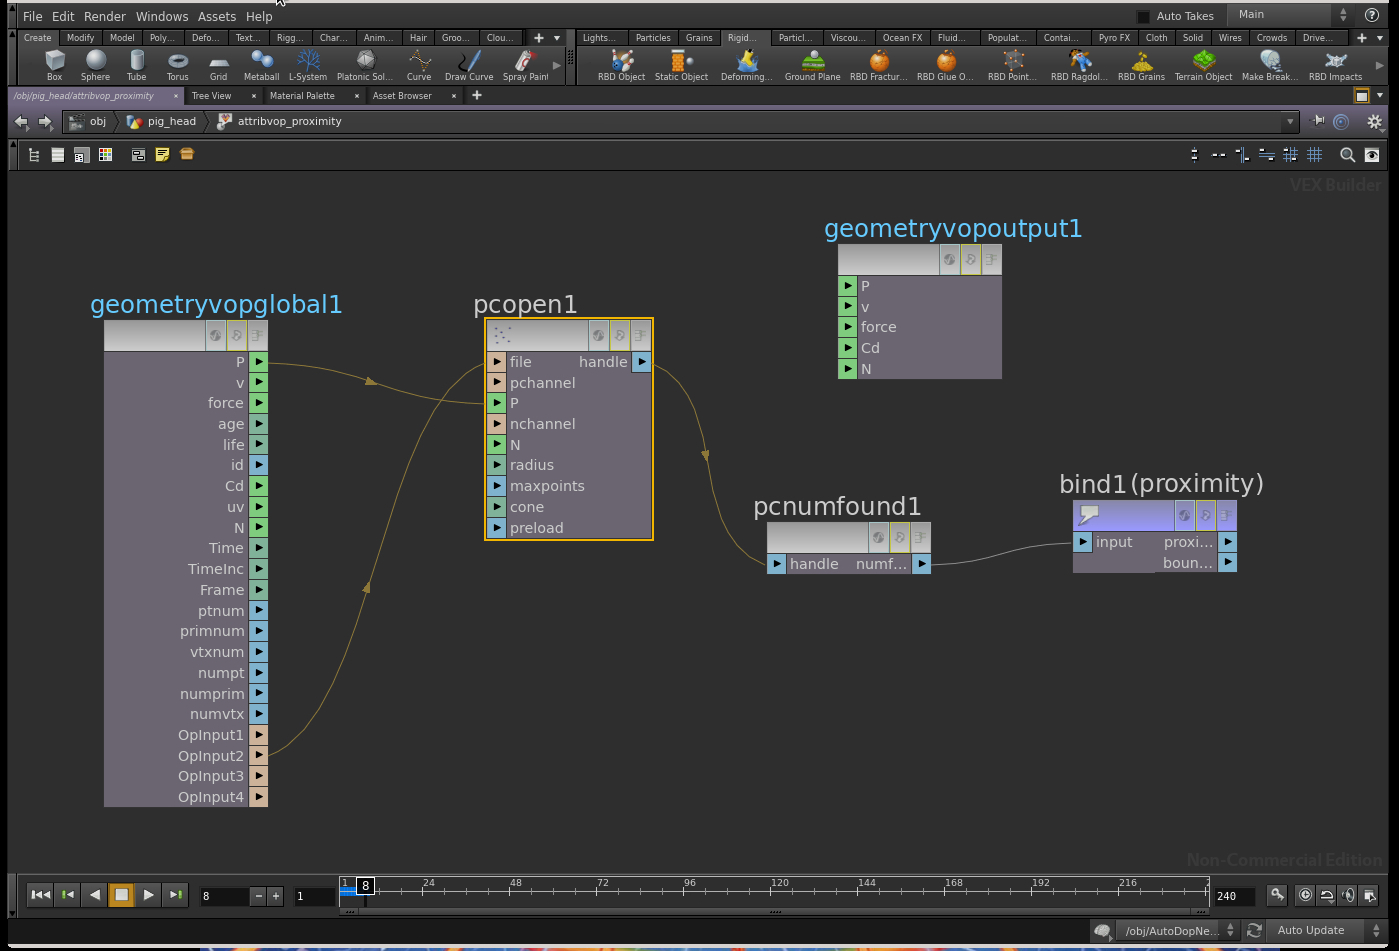
Dive down into the VOP node. Here's the fun part. Create a PC Open node. When we hook P from the geometryvopglobal1 node to the P on the pcopen1 node we're sampling the points of the first input by default, which is the pig head. Look closely at the image below. We are hooking the SECOND input, opinput2, into the file slot of pcopen1. The result is that we are opening a point cloud of the grains and sampling it for each point of the pig geometry. Hook up a pcNumFound node to return the number of grains that each point of the pig geometry finds. Lay down a bindExport node and call this new value proximity. I think of the proximity fuses that were invented in WW2. Little bombs were shot in the general direction of an enemy plane, and if one got close to a plane a proximity fuse would detonate the little bomb. I don't remember how it worked – probably it detected a changing magnetic field near a big plane carrying some steel bombs. But, I digress. Have a look at the geometry spreadsheet. We'll have to adjust the pcopen1 node settings to get proximity values that will work better for us. Try changing the search radius to 0.06. Set the Number of Points to 1. If there is even 1 grain of sand we want the alpha to be 1.0, for now.
Now would be a good time to create a generic mantraShader and assign it to the pig. We're going to need to test our transparency soon.
Change the Difficulty drop-down to Easy on the test_geometry_pighead1. This turns off the shaders that are inside the pig, and allows us to see the mantraShader we just assigned.
Attach an attributeWrangle node to the attributeVOP. Here is the expression I used:
if (@proximity > 0)
{
@Alpha = 1;
} else
{
@Alpha = 0;
}

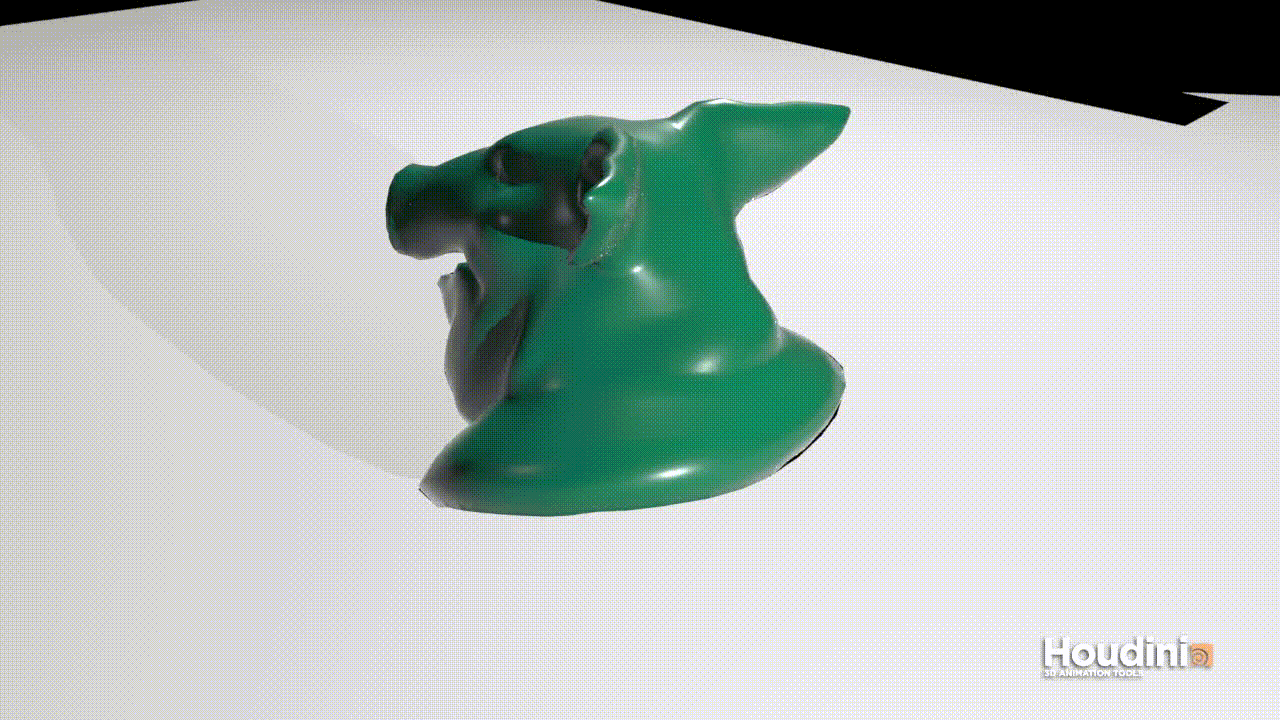
Now if you play through the simulation you should see the pig geometry start to disappear. Full disclosure: I ran a subdivide on the pig geometry on the version in the animated gif above, but don't worry, this will work well. We're going to blur the Alpha values...right now!
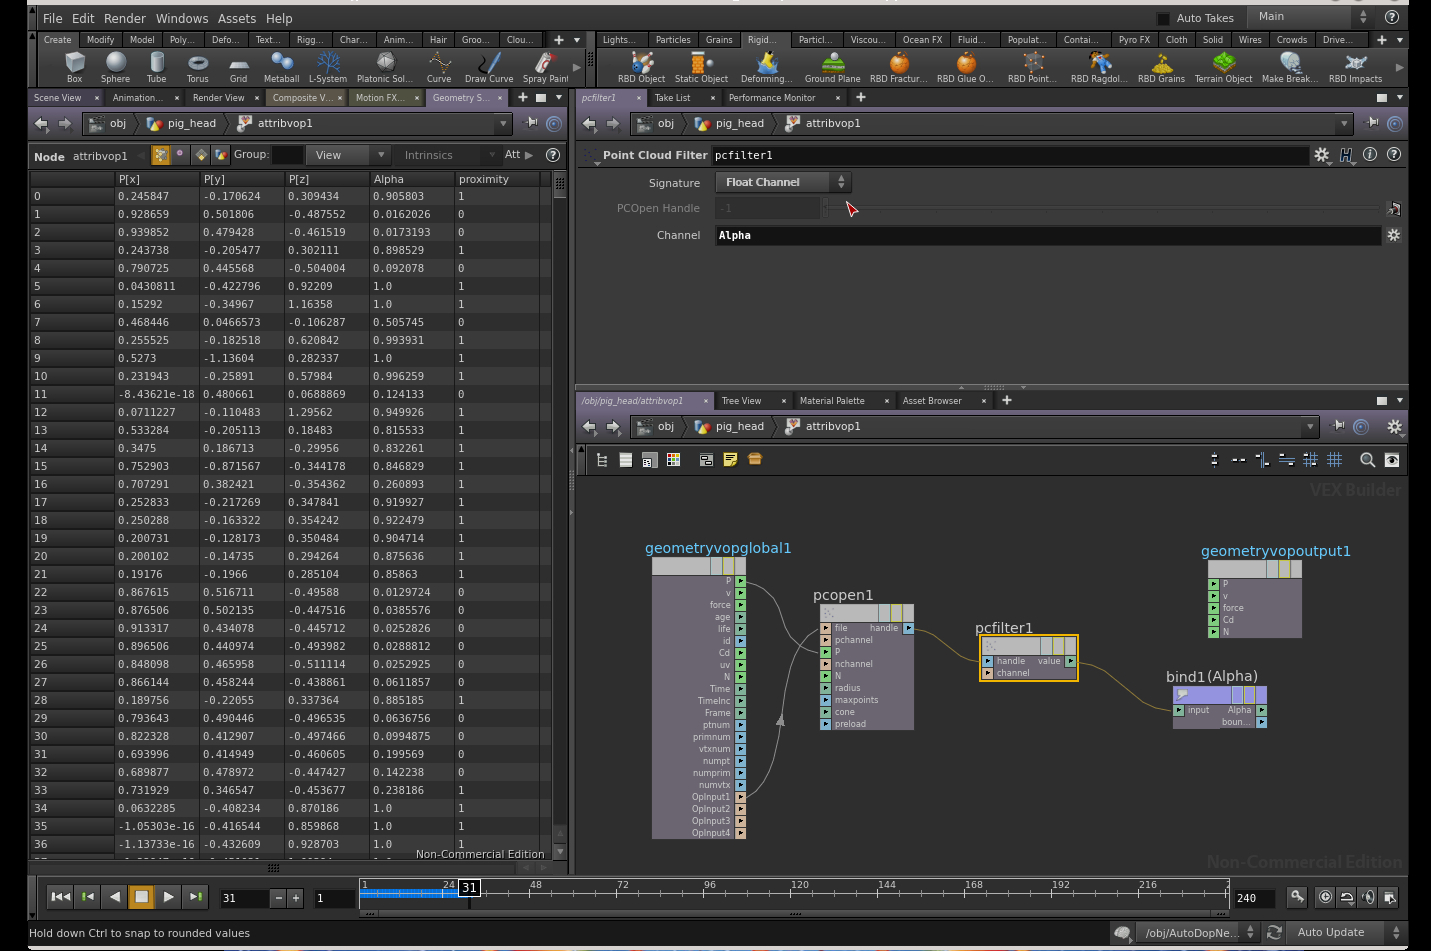
Create another attributeVOP node, and attach it below the attributeWrangle node we just made. Dive in and hook up a point cloud open node, and a PC Filter node, and a bindExport node.
Change the search radius on the pcopen1 to something like 0.3, and Number of points to something generous like 50.
Make sure to change the Signature on the pcfilter1 to Float Channel, and set the Channel to Alpha, with a capital A. Set the name in the bindExport to Alpha as well, again with a capital A.
Notice in the image below that the Alpha values are not 0,1. There are a lovely variety of float values for the alpha. If you switch to the scene view you'll see that the pig is fading out much more smoothly now.
So, this should be about done, right? Cache the grains, tweak the VOPs and you should be able to render this in Mantra. Well, there is one problem. When the grains from the ears fall past the pig's neck, they get close to the pig geometry and parts of the neck become opaque again briefly. That sucks. My work-around for that is to do an additional test on the grain velocity. Use an attribute transfer to get the grain velocity onto the pig points. If the grains are near part of the pig, and their velocities are very small, then the pig should be opaque there. It works in this shot, but it's easy to believe that it wouldn't always work 100% of the time. If you're more comfortable driving the alpha channel with the gravity mask, go for it.
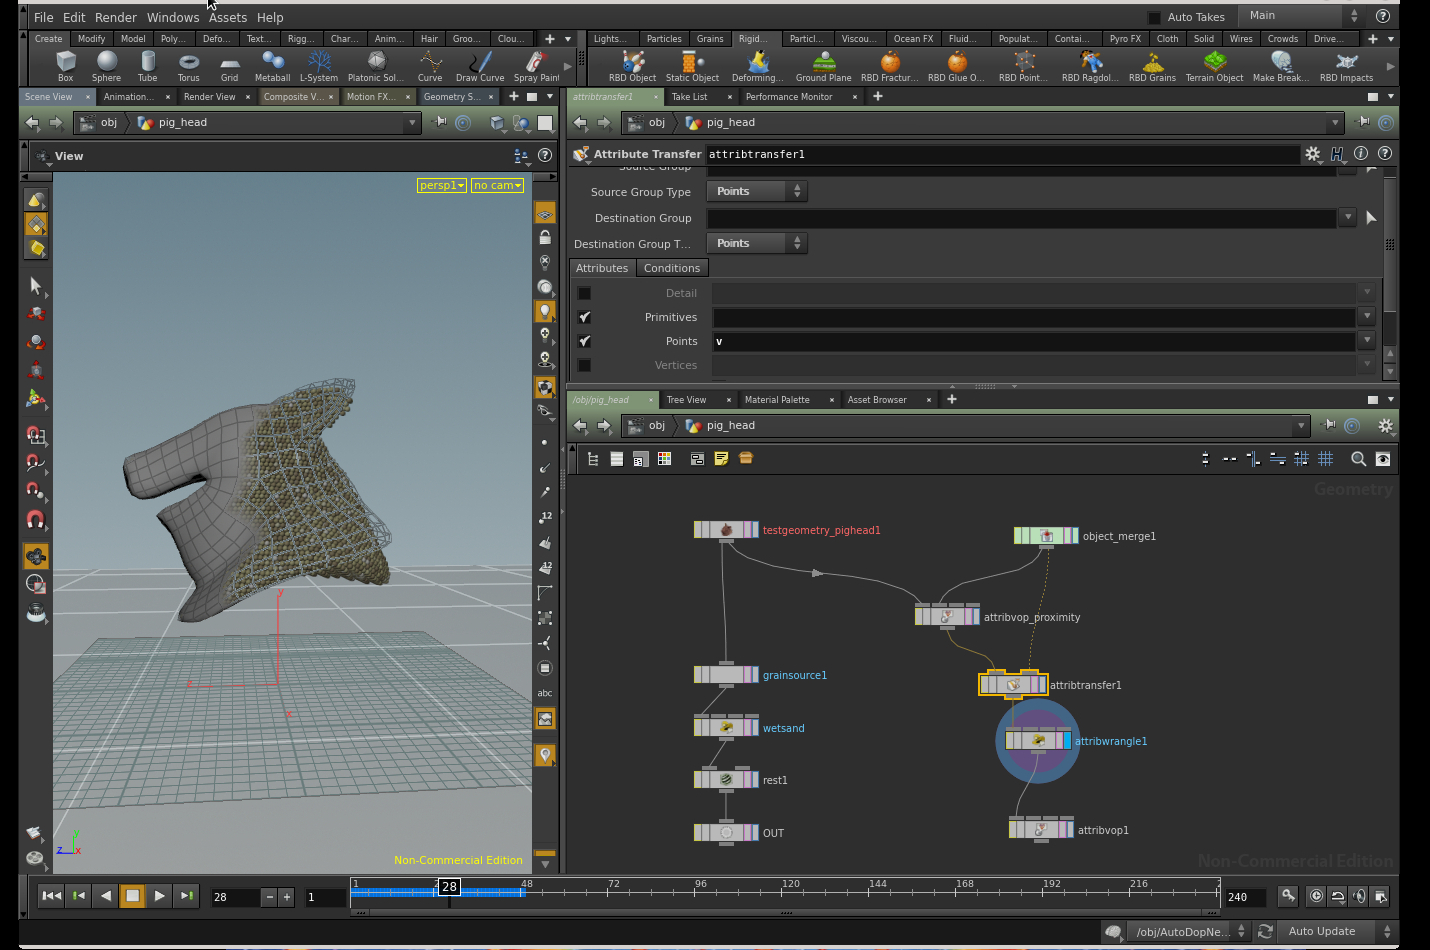
The last step is to add an attributeTransfer node between the first attributeVOP and the attribwrangle. Change the source and destination types to Points. Enter v for the attribute to transfer. Hook it up as shown below:
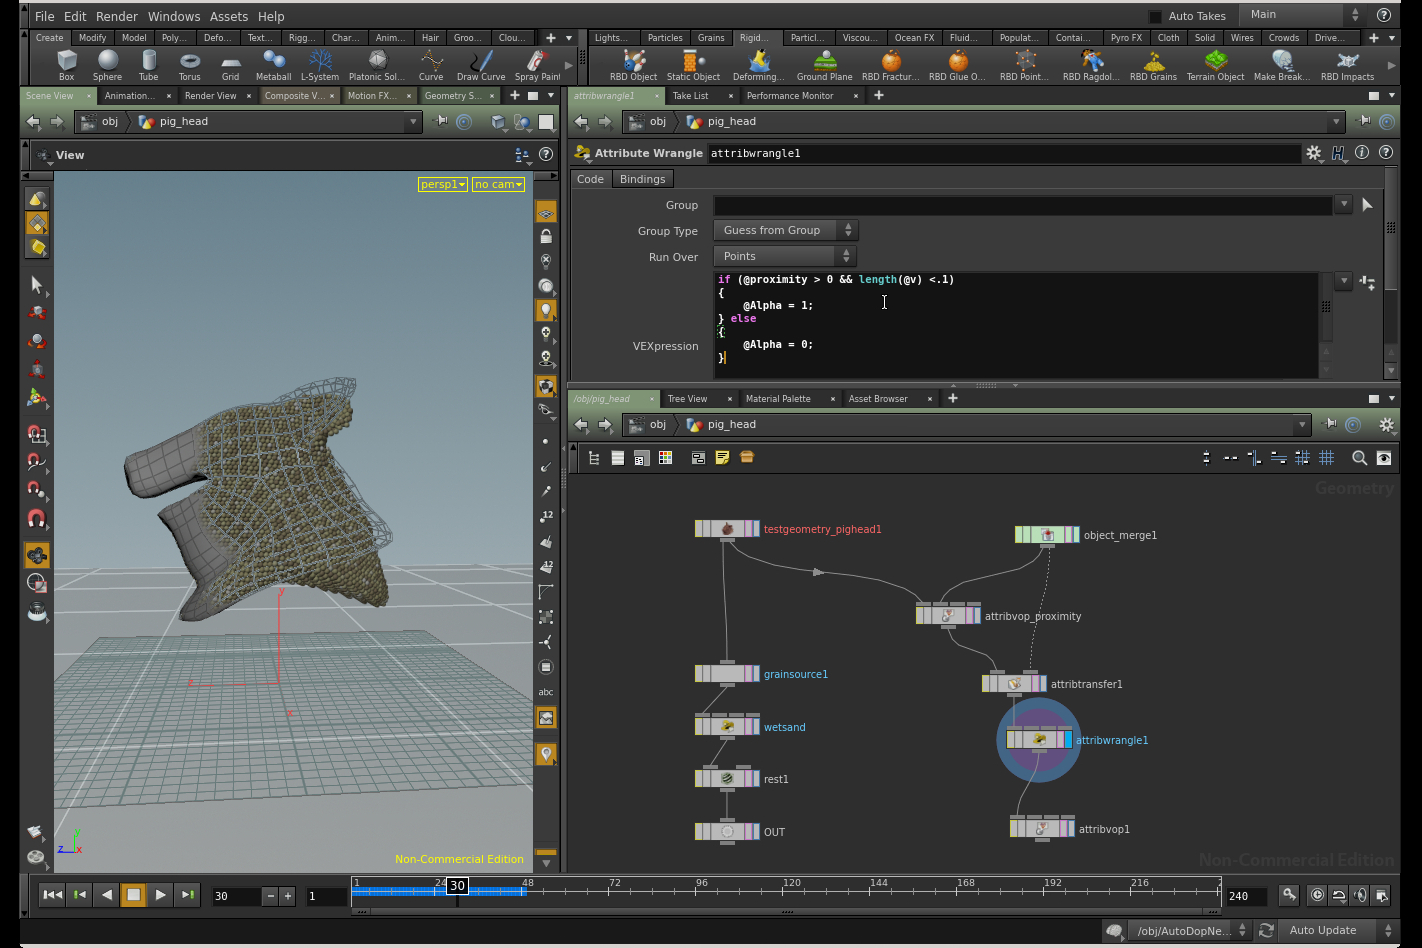
Now, the very last step is to add a condition on the magnitude of the velocity to the first if statement in the attribwrangle1 node:
if (@proximity > 0 && length(@v) <.1)
{
@Alpha = 1;
} else
{
@Alpha = 0;
}
The sand system in the gif at the top had about 2.5 million particles, and took about 2 hours to simulate 75 frames, as I recall. Please let me know if there are any points I've left out.